Let me guess: You’ve had it for years.
You bought your stability ball on sale or won it at a work raffle, sponsored by your wellness committee. You were excited at first. But once you got it home, it felt like too much work to actually pump it up. Even more to the point, if you did go to all the work to inflate it, what would you actually do with the big foreign blob?
The next thing you knew, the ball got thrown into a closet… still in the box. And, it’s been there ever since.
Sound familiar?
Most people don’t properly utilize their stability ball (or even get it out of its box). And I get it. It’s a totally intimidating apparatus if you’ve never been taught the basics.
When you know the essentials, however, you can ensure your safety and protect your time. No more wasting precious hours on ineffective workouts. You can get the toning, strengthening, and flexibility work you need, all from this one simple tool. It’s multifunctional, super fun, and easy to adapt to any fitness level.
So, are you ready to get your stability ball out of the closet and out of its box?

Here’s what you need to know to get started:
Make Sure Your Ball Is the Right Size for You
Throughout my 10+ years of being a fitness instructor, it’s been my experience that a 65-cm stability ball suites most people best. So, if you have no idea where to start when purchasing a stability ball, get that size (regardless of what the height chart indicates on the box).
Once it’s out of the box and pumped up, the real test is going to be your knee and hip alignment while seated on the ball. If your hips are level with or slightly above your knees, your stability ball is the right size for you. If your hips are way below your knees, you need to purchase a bigger stability ball. If your hips are way above your knees, a smaller stability ball would suite you best.
Make Sure Your Ball Is Inflated Properly, Depending on How Challenged You Want to Be
Here’s a general rule of thumb to remember: the more your stability ball is inflated, the more challenging your exercises will be. The less it’s inflated, the easier your workout will seem.
Why?
With a lesser-inflated stability ball, the ball flattens out more on the floor. Meaning, you get more stable surface area to work with. Therefore, your muscles don’t have to work quite as hard to stabilize compared to using a more-inflated stability ball. With a stability ball that’s more inflated, the ball stays more rounded. With less flat surface area to work with, your muscles have to fire more in order to stabilize.
Grip Is Good
It’s important to pay attention to what type of surface you’re working with. Carpet is often slippery. You want a surface that provides some grip. Or, you want to provide that grip for yourself by wearing tennis shoes. In fact, I encourage all people who are new to the stability ball to wear shoes when they’re first starting out.
Get on Safely
Here’s how I see most newbies get on a stability ball: The ball is in front of them. They start walking forward. They move their feet apart and try to slide the stability ball between their legs to sit down.
There’s an easier (safer, and more graceful) way: Put your pointer on top of the ball (so it doesn’t move on you), walk on the side of the ball until your feet are in front of it. Then, take a seat, like you’re sitting down into a chair.
Your Base Is a Big Deal
Whatever is touching the ground is your base. For example, if you’re sitting on the stability ball, your feet are your base.
A general rule of thumb: With a wider base, exercises become easier. With a more narrow base, exercises become more challenging.
When You’re Seated on the Ball, Two Things Will Keep You From Falling Off
The first is, the placement of your feet. As mentioned above, it’s important to pay attention to the width of the base you’re creating. When seated, it’s also important to notice where your feet are in relation to the ball. If your heels start to get too close to the ball, you’re going to feel unsafe. Keep your heels about six inches away from the ball, under your knees, to feel more stable.
Secondly, ask yourself, “Where am I on the clock?” If the stability ball were the face of a clock, with the top of the ball being 12 o’clock and the bottom, the part in contact with the floor, being 6 o’clock, you never want to be seated at 11 or 12 o’clock. Instead, you’ll feel most in control when you keep yourself around 1 o’clock.
Use Your Arms to Help
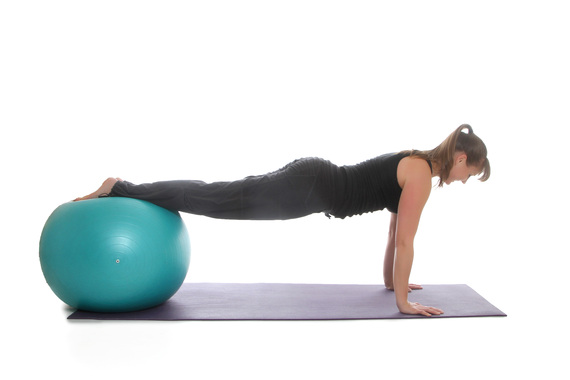
When your arms are close to your midline it’s more difficult to balance and stabilize, compared to when they’re out at a “T.” This rule of thumb applies whether you’re seated on the ball or you’re lying on your mat, doing core work, with the ball between you feet. If an exercise seems too challenge or you feel unsafe, moving your arms to “T” position will help.
Be Mindful of Your Range of Motion
As your movement gets bigger, an exercise becomes more challenging. The reason: It takes a lot of muscle engagement in order to control large movements. Smaller movements are easier to control. This tip can help you adapt almost any stability ball exercise to meet your specific needs and align with your fitness level.
More:
Yoga
Pilates
Fitness and Exercise
Stability Ball
Stability Ball Options
Muscle
Workout Tips
Choosing a Stability Ball
How to Choose a Stability Ball


